Orly Liquid Vinyl stamped over Zoya Dove!

After several solid color manicures in a row I decided I needed some design in my life again. Since I finally bought a new bottle of black to play with I reached for a favorite of mine and put together a fun little combo. I think I forget how much I love stamping sometimes.

If you want to see a swatch of Zoya Dove you can find one on a previous post. It's a color that seems underwhelming in the bottle but always makes me fall in love with it all over again each time I love it. It's funny since when I ordered it I expected to just swap it for something else but it sucked me in!

I'm really into fall colors at the moment so I decided on a light grey base of Zoya Dove. I then grabbed my MASH image plate m72 using Orly Liquid Vinyl.


Love? I do! I've never used this design before and I'm sort of asking myself why I skipped over so much. It's so much fun and I love the contrast of the grey and black with the sharp lines of the design. It's so much fun.


I love that it's a bold design in neutral colors. Perfect combo. I don't have much to say about Orly Liquid Vinyl except it stamped really well. I haven't used it as a full mani but it transferred great and gave a nice dark black stamp.

Do you love stamping as much as I do?

Finger Paints Vintage Velvet

I write this post with my head held in shame. How's that for some drama? Honestly though, I can't believe I've let so much time pass between posts again! It would be amazing if any of the people that were reading before are still here. If you are, then I love you! I wish I had some crazy or amazing story to explain my lack of posting but I don't. Once again, it's simply life and work. When I started this blog I was working from home and could pretty much do whatever I wanted when I felt like it so it was easy to keep up with the blog. Now that I'm working 5 days a week outside the home on a set schedule I'm having a hard time blending the blog posts into my time. I'm still doing my nails but they're just not making it on here. It makes me sad because I love this so much. I truly hope I can get things turned around this month now that I'm settled into my new job. Polished fingers crossed!

The mani I'm posting today I actually did last week after my Orly Gorgeous mani was destroyed. I actually have a little to say about that last mani before getting to the new one. If you missed that post you can go back to read the issues I had the first time I used it. I did stop using the bottle of Yellow Stopper and haven't had issues with the polish instantly lifting away from the cuticles but I still had problems with Orly Gorgeous. Although it did last longer than a day the second time around it still peeled off almost completely a couple days later. It was my first time using an Orly polish as a full mani and I used it with a Zoya basecoat and Seche Vite as a top. Between all of those factors I'm not entirely sure what the issue was. My first guess is that Orly doesn't play nice with the Zoya basecoat but it could easily be the Seche too. Basically, I have no clue. I'm not giving up on it though because I absolutely loved the color!

Anyway, onto a color I would have never even glanced at a year ago that I actually really loved. Finger Paints Vintage Velvet is a beautiful green polish that feels old and fresh at the same time. Green isn't a color I typically reach for but the softness of this color called out to be and I couldn't leave the store without it. It's also absolutely perfect for fall and will add a warmth to your hands as the weather cools down.


This was my first Finger Paints polish and I will absolutely be returning to their displays. The formula was smooth, easy to work with and best of all it was very opaque. The above picture was actually only one coat which is rare for me but two just wasn't needed at all. It also played very nice with my base and top coats as I had about 5 days of wear with it with minor imperfections even through work. I also received several compliments on the color which is always a plus!

If you're looking for a great fall color I would definitely recommend this one. Even if you're not usually a fan of greens it's a great addition to any collection.

I can also say that in the near future you should see a big difference in picture quality as we’re shopping for a new camera and I cannot wait to offer higher resolution photos!

Orly Gorgeous swatch!

Hello Blogger friends! I'm so sorry I've been completely missing since my hounds tooth post from August 27th. I didn't intend to be gone this long and I'm kind of mad at myself for it. I don't even know how I let it go almost a month without posting something! To make a long story short here's a bit of a quick timeline to explain my lack of posts.

Aug 28th - Sept 3rd - I wore the hell out of the hounds tooth mani with several fixes throughout the week because I loved it so much! I didn't want to give it up. By the time I finally did (mostly because I officially ran out of my mini bottle of Orly Blackout) I slapped on a basic color that I can't even remember what it was.

Sept 4th - 12th - Have you ever been so busy with life that you suddenly look at a calendar and realize you haven't done anything to prepare for a vacation and it it's only a few days away? No? I'm not sure how I did it either but it happened. I ended up spending all my non-working and sleeping hours getting ready for our 4 day vacation to Vermont that I never made it back here. I had planned a design to wear while away and post right before I left but I ran out of time. I never even did the design and ended up wearing a basic Zoya Charla mani for my trip. It was completely destroyed hiking and canoeing but we had so much fun and it was great to get away.

Sept 13th though now - The hubby and I ended up coming down with colds the night we got home from our trip on the twelfth and we're still sick. I wore a basic mani of Zoya Breezi through this cold because it sort of matched the weather and how I was feeling. I wasn't interested in doing anything but the bare minimum and even went two days with no polish at all which I hadn't done in months! Crazy, I know! I'm finally mostly better so I'm trying to get back into my normal nail routine. So without further ado, here is my new mani.

I bought some new pretties this week to perk myself up after being sick for so long and I'm so happy with my first pick. I bought and used Orly Gorgeous from the classic collection which isn't a color I had heard about before but loved how it looked in the bottle. I actually put it down at one point and I'm so happy I went back to grab it before leaving the store!


I really love this color. It's pink and purple at the same time and is fun to watch it change in different light. Because of the purple flash it has a blue-ish undertone which I absolutely love on my skin tone. Plus, it's a pink which is sort of an automatic win in my book. I'm actually not usually a big purple fan but I love it in this polish. This is actually my first full sized bottle of Orly and I'm really happy with it. The formula was thin but smooth and the brush was a good size for me. I used two coats but some people might need three depending on how dark your nail lines are. Mine tend to be really light naturally so two thin coats covered well for me. I did have some bubbling that you can see in the pictures but isn't noticeable in person. I don't usually have bubbling issues but I can live with it for now.

I do have a fail to share though that wasn't this polish's fault but it totally destroyed my mani. During my shopping trip I also picked up a bottle of Yellow Stopper. I've been having issues with my nail polish staining my nails so I was hoping to use something to keep the yellow tint I've developed from getting worse. BIG MISTAKE! After using the Yellow Stopper under my two coats of Orly Gorgeous and one coat of top coat it basically became an instant disaster. Within an hour of finishing the mani my polish was starting to lift along the edges. You can see what I mean in the picture below.


To say I was mad was an understatement. At this point I wasn't entirely sure what was going on since I was using two new products at the same time (probably not a good idea). In some spots I could have peeled off entire sections and I had barely even worn it. Still, I kept it on to test it out. Today it completely fell off. Yes, the polish fell off my nails in full sheets of color. The ones that didn't on their own did with barely any effort and in moments I had 10 bare nails without a drop of remover. I was mad! I knew this had to be because of the Yellow Stopper as I've heard such good things about Orly before. So when I got home from work I re-did my mani using the same color since I hadn't even had 24 hours of wear.


Much better! This picture and the first one I posted above are of my freshly done mani without using the Yellow Stopper. As you can see it's not lifting around the edges like you can see in picture number 2. I'm confident that it won't pop off tomorrow either. I can say that I will never touch a bottle of Yellow Stopper again!

Black and White Houndstooth Stamp!

At the last minute I decided to do a new mani design after my Zoya Pippa and OPI White Shatter nails took a beating the last couple days. I randomly picked a design and dove in with the plan of it just getting me through the weekend. What I didn't count on was falling in love with the finished product!

Some of you might remember how much I dislike working with my OPI Alpine Snow. White can be tricky in general but whenever I use this it seems like I'm 10 times more messy than I am with anything else. I'm not sure if it's because of it being a stubborn white or if I'm just not used to the large brush of OPI polishes but either way I kind of dread using it. This is one time though that I'm so glad I used it anyway!

I decided on a black and white design using the houndstooth design on plate m63 of my MASH plates. I've been eyeing this design for a while but kept picking other things. Now I'm wondering what took me so long! I didn't take a picture of the Alpine Snow because I was distracted by the hurricane update and then just started stamping. But I do have a picture of it from my 4th of July designs that I'll share just so you can see how it looks on its own.


(Ignore the 4th of July design on the other nails.)


This is two coats which isn't too bad considering it's a white which usually aren’t all that opaque. It goes on very streaky during the first coat but should even out with the second. I'm not sure if it's just my bottle or the formula but it's been kind of clumpy from the start and I've only had it a short time. It’s most definitely not anywhere near as smooth as my other polishes. It's just another thing that frustrates me about using it. Sorry OPI! Anyway, moving on to the good part!


How fun is that? I'm so in love with it that I don't even know what to say because I keep staring at my nails instead of typing. The way the black and white look together is fantastic and looks much better in person than the camera shows. You can see a small mistake on my index finger which the camera makes more noticeable than it is in person. I'm very low on my mini bottle of Orly Blackout so I decided to just leave it. Orly has been stamping pretty well for me so I might stick with it for black but a full size bottle instead. We'll just have to see how it goes when I'm actually at the store.

I'm not sure how normal it is to take the time to have nice looking nails in preparation for a hurricane but I couldn't just leave them all chipped and horrible looking. Plus I was pretty bored since the hubby was playing something on the ps3 and I was sort of sick of hearing about the ever changing forecast.

I hope those in the path of Hurricane Irene stay safe and everyone else send positive thoughts to the east coast!

Never a dull moment.

I've mentioned here a few times that things have been pretty hectic around here for the last month but I haven't really shared anything. I've been waiting until there seemed to be a resolution to the mess and it took this long to get there. I'll start from the beginning.

The first week of August, Nick (the hubby) was in a car accident. Yeah, that kind of mess. He's fine and thankfully only had a minor injury to his leg which I'll get to in a bit. The real damage was to the car. Unfortunately it was totaled which is really sad for a car that was less than a year old. Sigh. To make a long story short, someone decided to be an idiot and cut of another car. That caused a domino effect of cars slamming on their brakes and into each other. My hubby actually managed to slow his car and not hit the person in front of him but another vehicle slammed into him which pushed his car into the one in front of his. In total, five cars were involved and the person that caused the entire thing was long gone.

Like I said, he is okay! He did end up with a small tear in his calf muscle from bracing for the impact which turned into a large colorful bruise and is now a hard lump in his leg. Considering what could have happened this is very minor and something we're very grateful for! The car did its job and took the full impact and even left him whiplash free. It's truly amazing the impact cars can take! The other drivers refused medical treatment at the scene so we can only assume they're all fine but you never know what pops up after the adrenaline wears off. Another good thing is this accident was completely not his fault so all the cost will actually go on the insurance of someone else. Who exactly that will be is another part of the mess with so many people involved.

He had a rental for a week and a half and initially we decided he could just use my car for a while since I work from home and don't really need it during the day. Except life was having too much fun and threw another wrench into the mix. Right before all this happened I decided I couldn't stand being at home all day everyday anymore so I started applying for new jobs in my previous line of work. Two weeks after his accident I was offered a new job. Something that would usually be very exciting was suddenly an 'oh crap' moment because it was just about the worst timing. We suddenly had a mad dash to decide what he would get for a second car and getting one quickly before my new job started. Phew!

The good news is he now has a brand new car he is very happy with and I had my car back just in time to start my new job. How's that for a month? We found it pretty stressful especially dealing with insurance companies and the company that owned his lease that he lost in the middle of it all. Actually, we're still dealing with them and it doesn't look like it will end soon. The insurance company was the easier of the two as they agreed right away to the pay off amount for his lease. The real problem is the company that owned the lease is taking their sweet time processing that pay off check.

So that's the way things have been going here lately. I am enjoying my new job though. It's taking me a bit to get used to the new schedule since my days had been pretty laid back for a while but it's nice having something to really do all day since our at home business really doesn't need me most of the time. We're also going away for a long weekend in early September which we need after all this! I'm hoping after the trip our life will settle back down and find a new rhythm that lets me get more manicures done!

But we have to get through Hurricane Irene first. Fingers crossed!

Zoya Pippa with OPI White Shatter!

Sorry for the smaller number of posts this month! I just realized August is almost over and I only have a handful for the entire month. Unfortunately life has been in the way for the last several weeks and I'm not doing any where near as many manicures as I would like. Hopefully things will settle a bit soon and I'll get back on track. I'll share about the things that have been going on in a post this week! Anyway, back to the nails.

Today I decided to do a final burst of summer before settling into the wonderful fall colors all the brands are putting out. Fall is my favorite season so I'm looking forward to it but I'm still holding onto summer a little. So, I decided to finally whip out my Zoya Pippa to share! I bought this color during a promotion a couple months ago and only used it on my toes until now. It's a very bright yellow so it can be a bit overwhelming but oh so pretty!


This color was so hard to photograph! All my pictures were showing it so much lighter than it was in person and I just couldn't post that. I try so hard to give you accurate color representations and I couldn't let myself settle. After walking from room to room and trying different lighting I grabbed a different camera. I had to fight with that one to take a clear picture and finally managed a clear and accurate picture which you see above. Phew!

As for the color itself, it's a bright mustard yellow that always grabs attention! Its formula is a bit thinner than other Zoya's but still very smooth and easy to work with. Yellows are notorious for being streaky though so I used 1 coat of OPI Alpine Snow before using Pippa and it worked perfectly! Above is only one coat of Pippa over the white. If I was going to wear this color on its own I would have done a second coat but I planned to use the shatter so I left it as is. Still though, considering it's a thin yellow polish it covered really well with the white base!

Then to tone down the yellow just a bit I used my OPI White Shatter which was really just an excuse to use it again. It's so much fun watching it do its thing that even my Hubby stood nearby watching over my shoulder. He was impressed that it happened so fast. It's like magic in a bottle!


Even with the white the brightness of Pippa still shows through! I know so many people are tired of the shatters especially now that every brand seems to have their own version but I still love it every time. Of course I used Seche Vite over the top to smooth everything out and give it a shiny look as the shatters dry very matte. Plus the shatter does leave a rough texture on your nails so if you're used to the smoothness of most nail polish a top coat is a must. I also used a coat of Seche Vite over the yellow before I shattered.

For those of you that have never used a shatter before I want to point out you must wait until your nails are completely dry before using any shatter or crackle to get the right reaction. It's another reason I use Seche Vite to help it dry quickly and solid.

My last grab of summer before embracing fall is complete and I think I succeeded with this being a very bright and sunny mani! I'm looking forward to the blues, grays, browns and other fun colors of fall and all the designs I can do with that. Of course my pinks will still make their way in there too as I can never be completely without my favorite color.

I hope you're having a good week!

Stamping Tutorial! (Picture heavy)

**I've decided to start using watermarks on my photos after seeing someone use one of my pictures that they saved off Google. I hope you're still able to enjoy the pictures and just simply pretend the watermark isn't there. Sorry I had to resort to this!**

As promised, here is my stamping tutorial! I know I would have never jumped into stamping if not for tutorials posted by other nail lovers so I wanted to offer readers of this blog that same help. Stamping can sound complicated at first but I assure it's not only easy but fun! I should also warn you that it's completely addicting as proven by the numerous posts on this blog that involve stamping. So, I lets get to it!

First you will need image plates which are offered by several different brands including the well known Konad. I use MASH plates which are duplicates of many Konad designs for a much lower price. Bundle Monster is another popular one and also affordable. No matter which of these brands you pick this tutorial will still apply!

You will also need the following:

Stamper
Scraper (you can also get away with an old credit card)
Nail polish remover
Q-tips or cotton pads (I prefer q-tips)
Paper towel or something to protect your work surface
Nail polishes
Top coat


Once you have your colors and design picked out you will need to apply your base coat (if you use one - you should!) and base color. I almost always use two coats but you can decide based on the color you’re using. Next I would recommend using a top coat (I use Seche Vite) on your base color before stamping. This will give you a bit of a buffer if you make any mistakes later allowing you to use a q-tip and some remover to take off the design without removing your base color. This has saved me several times!


When your nails are dry you're ready to stamp! The first picture shows how I typically set up my stamping tools. I always do this at my dining room table so I can spread out a bit and have a sturdy flat surface to work on. I use a sheet of paper towel folded in half to protect my table and I use q-tips with remover to clean the plate and stamper as I go to prevent the color from building up.

Instructions:

Step 1: Brush some nail polish onto the image of your choice. I usually only put the polish on half of the design (especially full nail images).


Step 2: Use your scraper (or old credit card) and firmly 'scrape' the polish across the image which will fill in the rest of the design. This is where the paper towel comes in handy as some polish will be pushed off the plate so be sure to protect your work surface! Sometimes you will need to scrape twice depending on how much polish you put on the design.


Step 3: Press your stamper firmly and evenly onto the design to pick up the image. Check your stamper to be sure the design transferred properly and isn't too thick or smudged. If it is, use remover and a q-tip to clean the stamper and start again. If it looks smudged on the stamper than it will on the nail as well.


Step 4: Line up the image with the side of your nail and gently but firmly roll the stamper from one side of the nail to the other. (This method is the best for full nail designs but some smaller designs can simply be pressed onto the desired location.)


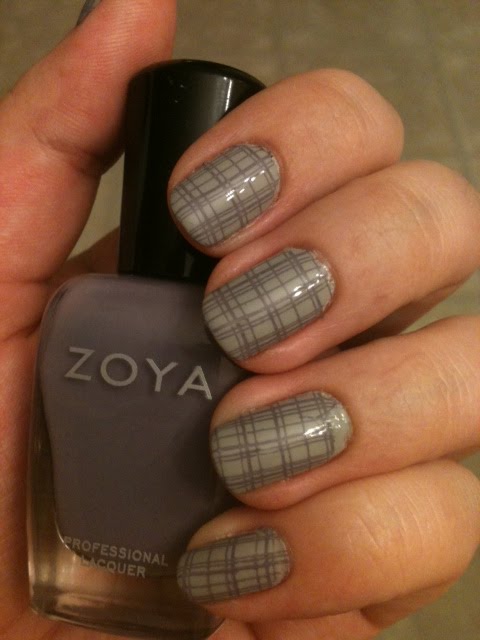
Tada! You should now have your selected design stamped across your nail. Here is how my final result looked.


If you're happy with how it looks you can repeat the process for your other nails. You will get some of the stamp on your skin but it will remove easily with remover. If you made a mistake you can simply use the tip from above and remove it gently with a q-tip and nail polish remover while leaving your base color intact. If you do this I recommend adding a layer of top coat again before re-stamping. Then of course a layer of top coat over all your designs to keep them looking beautiful!

Important tip: As you stamp all your nails you will need to clean up the stamper and image plate as you go. I usually do two nails in a row before cleaning the plate but usually clean the stamper after each transfer. It's important to keep the color from building up on any of the tools so you get as clean of a design as possible. I recommend using q-tips instead of cotton pads since they tend to fall apart but it's up to your personal choice.

Picking your polish: The good news is you can use just about anything you want. Konad makes special stamping polishes that they recommend but you don't have to limit yourself to just those. Plenty of brands work very well with stamping; it's just trial and error and personal preference. I've used Zoya, Sally Hansen, OPI and Orly with great results so don't be afraid to try whatever brand you have in your collection!

As for color, the general rule is the more opaque the polish the better it will stamp but you won't know if it will work until you try. Play around with different combinations and see what works. There are so many choices and the designs you could make are just about endless. Play with your polishes and have fun with it. You just might surprise yourself and love something unexpected!

What I used: For the design in this tutorial I used Zoya Jolene as a base color and Sally Hansen Complete Manicure 'I Pink I Can'. I also used Zoya Anchor as my base and Seche Vite as my top coat. My image plate is m63 by MASH and my scraper and stamper are by Konad. You can also see my bottle of Zoya Remove+ and my cute pink q-tips (I told you I love pink!)

I hope this helps some of you jump into stamping or help if you're having issues. I'm by no means an expert but this is what works for me and I've had great results. Like anything else the more you practice the better you'll get and before you know it you will fly through the process in no time. Don't get discouraged by mistakes, we all make them. Just clean it up and start again. Sometimes you have to play around with how much polish you use on the image and the way you apply it to your nail. Overall, the steps in this tutorial should set you on the right path to making beautiful designs!

Happy stamping!

Zoya Dove with Caitlin stamping!

Today I have another stamped design to share that I created with two of my Zoya colors. I know I said my next stamping manicure would be a tutorial but I did this at about this morning and was so tired that I completely forgot to document the entire process. I will do it though, I swear!

Anyway, this design was actually picked by my hubby after I didn't like the first image he picked. Overall it came out really well except for one nail. The weird part is I never even noticed the mistake until after I had cleaned up and put a layer of my top coat on. Talk about not paying attention! It's pretty noticeable in the pictures but less so in person so I've decided to just leave it, at least for now.

Above is Zoya Dove which I truly love more than I ever thought I would. I actually bought this color during a promotion Zoya offered that gave away Dove and Caitlin together with a purchase. I knew I wanted Caitlin from the moment I saw it online but assumed I wouldn't like Dove too much and was planning to swap it before it even arrived. Except to my surprise, I loved it! This is only my second time using it as a full mani and the first was with the newspaper design so I really need to find more excuses to use it. The formula is very smooth and the color is easily opaque in two coats. It's a great color for fall and pairs really well with Caitlin which I also used in this design. You can see another design I did with these two colors reversed from June.


For the above design I used MASH plate m60 with Caitlin to make the thin plaid image. This one was a bit trickier than others since the lines of the image are so thin they had a tendency to drag across the nail a little which might have been what caused the mistake I mentioned before. If you look at the base of my ring finger you can see a chunk of Dove is completely missing the design. I still can't believe I didn't notice while doing it. I guess I was even more tired than I thought.


Besides the little nail fail I really like how this looks. Caitlin and Dove work perfectly together and both are great for stamping. This mani is very fall-ish which I'm kind of not ready for so I might not wear it for too long. I still want to enjoy the bright colors of summer before giving into the upcoming change of seasons. Fall is my favorite though so I'll be enjoying all the fantastic seasonal colors coming out but I still want my bright summer fun for a bit longer!

I hope everyone had a good week and will have an even better weekend. We have a lot going on here that’s pretty stressful that I'll share later but it's nice to lose myself in a fun mani for a bit!

Zoya Laney & Jolene with stamping! - Updated!

This is my first time ever wearing silver nail polish and I was a little worried I wouldn't be happy with it. Surprisingly I am. I wouldn't say its my favorite one I've ever done but its fun and a change for me. Plus I was able to play with one of my new colors mixed with one of my favorites. What's better than that?

Zoya Laney is from my most recent Zoya order that also came with Charla and Gilda from my most two recent posts. It's actually shocking that I ordered this color at all and even my hubby was a bit surprised since I've never reached for a silver polish before. Life is fun when you change it up a bit, so here we go!


This is Laney with only one coat which I almost never do but the coverage was pretty decent and I was planning to stamp over it anyway. You can see that it was a little streaky which was a bit frustrating but I decided to just hope that the designs would minimize it.

For me, Laney seemed to play some tricks on me. On their site they describe Laney as, "Silver metallic duochrome. A frosty hint of green creates a unique "oil-slick" look." The description sounded interesting so I was really curious how it would look on. When I looked at the bottle I could see the green hiding inside the silver pretty well. Then I put on the nail and it seemed to lose most of what the description promised. On the nail there is no green to be found and I cannot see an 'oil-slick' look at all. It is metallic in the right light though so at least that part is coming through. I'm not sure why the features of this color didn't translate and maybe it would a bit more had I done a second coat but I'm still happy with this color. I've always preferred silver jewelry over gold so I guess that's not too surprising.

Since I decided I needed more stamping designs in my life I pulled out my MASH plates and picked a design from plate m64. I used a flower/paisley full nail design using Zoya Jolene over the silver Laney.


I really like the pink and silver contrast but I wish I had picked a thicker design so that the pink showed up more. Besides that though, I'm happy with how it looks. I almost used black but decided at the last second to use the same pink I currently have on my toes. Plus Zoya Jolene is one of my absolute favorite Zoya colors so it's pretty hard for me not to reach for it.

As usual the stamping went wonderfully and I've noticed I'm getting faster and faster with the process! I really should make a tutorial for stamping soon since it wasn't until I saw one that made me finally jump in and buy a set. Maybe next time I stamp I'll do a whole tutorial for those interested.

Hope you have a fun weekend!

UPDATE: So, apparently Laney does have flashes of green on the nail after all but only in the right lighting. In my house the green is completely missing in action but at the restaurant we went to tonight, you could see the green a bit when my hand moved just right. I haven't seen the color in the sunlight yet so maybe that will bring it out even more. I'll update if it makes a difference!

Zoya Gilda - so beautiful!

Pink nail polish is awesome, at least in my world. But when you pack it with small glitter and make it so sparkly that it practically lights up in the sunlight it hits a whole new level. This is exactly what Zoya did when they made Gilda and I'm so happy I bought this color. It's fantastic!

Above is a picture of Gilda taken inside with artificial light and it's still gorgeous! Gilda is from the Sparkle collection which is the same collection as Charla that I used earlier this week. The formula was very similar to Charla. I did find if you accidentally apply it too thick it will get chunky which is because of the glitter but if you keep your coats thin like usual it will glide right across the nail. I used two coats for solid coverage and my usual coat of Seche Vite to seal it all together.

The color is a bright pink that will grab attention! It's a perfect selection for summer and would be great for a pedicure in a fun pair of sandals as well. I can imagine this color on your nails hanging out at the pool or beach would be absolutely beautiful. It's much more than your typical pink and seems to be a pretty unique color. I definitely don't have any other pink like it in my collection. Zoya considers Gilda a foil-glitter metallic and I think you really need all three of those words to describe how interesting the colors from the Sparkle collection are.


The picture above was taken next to a window and you can already see the difference in the sparkle. The sun really lights up this color. It would a crime not to take this beauty outside so if you buy anything from the Sparkle collection you will most definitely want to see it in the sun. I tried getting a different picture in more direct sunlight but it seems like the sun always disappears when I need to take these pictures! Oh well, it will just keep it as a little surprise when you try these beauties out for yourself!

I feel like it's been awhile since I stamped so my next mani will be some type of stamping, I just have decide what. In the mean time, I'm going to enjoy my beautiful pink sparkle nails!

Zoya Charla - Oh how I love you!

I was a bit sad to remove my water marble yesterday but was even more excited to try out my Zoya Remove+ and new Zoya Charla and they did not disappoint! For one, the Remove+ is awesome! I used less cotton pads and less remover than I've ever used with other brands and my nails were perfectly clean. I actually was able to do all 10 nails with only two small cotton pads. It was fantastic! Best of all not a single person complained about the smell and my fingers didn't feel sticky and dried out. I'm officially in love with Remove+ and would highly recommend it to anyone!

Now on to the best part. When I spread Charla across my first nail I actually had an audible gasp at how pretty it was! I had seen plenty of pictures of it online before buying but it's just so different in person. I was in awe of it right away. After only completing 5 nails I even posted about it on Facebook! It is by far my favorite color in my collection right now and that's saying something since I love almost everything I own right now. I have plenty of pictures to share with you to show the way it changes in different light so let's just get right to it.


This picture was taken in the sun along side a window and it's just beautiful! The application was fantastic. The formula is a bit thin but it spreads wonderfully and I didn't have any problems with it running. I actually could have just left it at one coat since the coverage was so great but I still did my automatic two. Describing Charla is really hard since it looks different in different light sources. In the picture above it looks teal with green and sometimes silver shimmer. It plays in the sunlight so wonderfully. I didn't think this did it enough justice though and pushed for a better sunlight picture which wasn't easy with the cloud cover we had today.


Look at that! In more direct sunlight it just lights up with a beautiful sparkles and comes off very blue (ignore the tire to my jeep in the background). My neighbor probably thinks I'm crazy since I was standing at my door for a while trying to catch a good picture of my nails in the sun. The clouds weren't cooperating so it took several tries. Oh well, it was worth catching the sparkle in this picture! You can see very little green in this picture compared to the indirect sunlight one from above but Charla isn't done yet. This color has a lot of tricks hidden in this bottle and gave me a completely different look when I snapped a picture inside with artificial light.


Just like that, Charla is suddenly more green than blue. It's like having three colors in one bottle and you just never know which one will flash its beauty. No matter what light I'm in I still have nothing but love of this color. It's so much fun! The way it looks inside with lamp light in the picture above actually reminds me of Emerald City from the Wizard of Oz which is exactly what my hubby said when he saw it when he got home. Then I showed him how it looked outside and he was surprised at the change! I'm happy to also say that he was impressed.

I consider this color a must have for anyone that likes a little sparkle in their life! It's fantastic for summer and so many people have said it looks fantastic underwater. I haven't been able to test that out but I can imagine the beauty. I can't wait to try out Gilda which is from the Sparkle collection which is the same as Charla. Check back for that later this week!

Tomorrow is my birthday and my hubby and I are spending the day in Connecticut. We're heading to Mystic Aquarium for the day and my nails will fit right in. It was a complete coincidence that I used Charla in time for our visit there but it worked out quite well. Maybe I'll get to see them underwater after all since they have an area where you can pet certain sea creatures!

Zoya order arrival!

Oh how I love when packages are delivered. I practically stalked the FedEx tracking page for the past two days and when the truck pulled up in front of my house I actually said "yay!" out loud. I love that Zoya ships quickly even during a big promo because patience was not part of my vocabulary once I placed this order. Anyway, here we go with the unpacking!

Pure happiness in a box! I was a little surprised to find the Smoke & Mirrors collection plate and the Touch collection spoons since in my past promo orders those were always automatically removed once I put the code in. I'm definitely not complaining and it made me want some colors from Smoke & Mirrors I was otherwise not considering! Nimue and Neeka look so much better on me than I thought they would and now I want Petra for sure. Tao looks better on the plate than it did online to me too so that might find its way to my collection too. As for the touch collection, I'm not totally in love. Minka is horrible on me and makes me look like I'm going for a zombie look. Shay and Pandora look fine on me with Shay being slightly better but I just can't picture myself actually using them.

I also ordered 6 spoons of colors I wasn't completely sure about. Two of them are actually from Smoke & Mirrors since I didn't think I would get the plate. Oh well! I labeled each spoon so you wouldn't have to try to read the tiny little type on each one.


Out of the 6 I fell in love with Dana and Robyn right away! I will be buying those two. It's a must! Codie is a bit too dark on me by itself but would be good in a design with other colors so I haven't completely decided on that one yet. I'm skipping Marina but ended up liking other colors from the collection. Apple I'm still on the fence about but Reece is an absolute no. The gold shimmer is horrible against my skin.

I'm excited to try the Remove+ for the first time. I had been thinking about ordering it since so many people rave about how awesome it is but never actually did. The promo was kind of a push to finally give it a try. So far the lack of horrible smell is pretty impressive and my Hubby commented on that right away. I love the bottle design too! I'll let you know what I think once I use it. Now, onto my newest additions!


From right to left are Gilda, Laney and Charla! I'm already in love with Charla just in the bottle and I can't wait to use her but after all the work I did for the water marble I'll wait a few days. It will be my first out of the three for sure though. I can already agree with the descriptions of Charla being like a mermaid in a bottle. It's just so gorgeous! I'm looking forward to seeing Gilda on the nail too. There weren't too many pictures of that one online but I loved how it sounded. As for Laney, I have a few nail designs in mind for that one!

After gushing over this order since it was delivered I really need to get back to getting work done but I just had to share my new pretties! If you ordered some new Zoya during this promo I hope yours arrives soon too so you can play. =)

My first ever water marble!

Ever since I saw a picture of a water marble I was fascinated! I automatically assumed it was complicated and dismissed the idea of ever doing it. Then I happened to come across a video tutorial on Youtube when I was browsing other nail videos. When I saw how simple it seemed I decided to give it a try. Then I put it off and sort of avoided it. Call me a chicken.

Then last night I once again was stuck on what to do next. I needed to do something because I can no longer leave my nails naked but I'm expecting my new Zoya order tomorrow (yay!). I left it up to the hubby again and of course the first thing he said was to do a marble. Sigh. He picked three colors he thought would be good together and declared it my new mani. So off I went and it was horrible. The nail polish decided it hated my water and refused to cooperate. I was frustrated and quite annoyed. So I ditched my room temperature filtered water and cleaned up the mess and walked away. I gave up.

Then this afternoon I decided I must win. I couldn't let it beat me. I grabbed some room temperature distilled water instead and gave it another try. Guess what? Success! It worked and I was thrilled. I taped up my fingers like one tutorial said which was weird and sometimes difficult. Especially when I had to finish the last few fingers with the others covered in tape. Anyway, I picked an order for the colors and dove right in. I'm very happy to say that I now have 10 water marbled nails and I'm very happy with how it looks. Was it messy? Oh my god yes! It's almost insane. I had so many toothpicks covered in nail polish, the bowl looked like half a rainbow exploded and very colorful pieces of tape were scattered around my table. I should have taken a picture of the aftermath but I didn't. In the end though, this was my result.


TaDa! My hubby's three choices were Zoya Breezi, Essie Turquoise & Caicos and Orly Blackout. He apparently really likes Zoya Breezi since it's the second time in a month that he picked it as part of his choice. The colors actually worked really well together and all three spread across the surface of the water pretty well. Its funny how doing basically the same pattern each time created such different results. It's actually fun to watch different designs appear in the bowl. Mine was wide enough that I could do two fingers at a time which made it much quicker.


You can see a little smudging at the base of my pinky from when I removed the tape. After that I cut the rest of the pieces off to avoid messing up all the work I had just finished. Even though Orly Blackout is normally quite dark, once it was in the middle of the marble and other colors it actually appears slightly brown on the nail. There's only one nail that it actually came out dark enough to be an obvious black. I'm still really happy with it though whether it looks brown or black.

So, would I do a marble again? I think so. It's fun to play with the nail polish and create a unique design in the water. Would I do anything different? Besides trying other colors, not really. I will cut the tape off all the nails next time but that's the only change. The tape is worth the effort as it made cleanup much faster. There was very minimal nail polish on my skin so it only too a couple q-tips to clean up the very edges of all 10 nails. I will jump right to the distilled water next time since that obviously worked much better. I guess our filtered tap water just isn't friendly enough. Would I recommend a water marble to someone else? Sure! As long as you're prepared for the mess and possible frustration if your nail polish and water won't play together. In the end it really does create an interesting effect.

Tomorrow my new Zoya order should arrive as long as FedEx delivers like they said they would! I took advantage of their promotion for reaching 50,000 'likes' which offers a free bottle of their Remove+ with any purchase. It's still going if you're interested and you have until the 24th! I can't wait to try their polish remover for the first time and play with my new colors.

Happy weekend!

One word. Teenagers.

I've become an old person in my early 20's simply because I hear my self make comments about not liking teenagers. It sounds funny since it hasn't been all that long since I was one. Before you think I'm attacking an entire age segment for no reason, I assure you I have one. It's called vandalism and it sucks.

Two days ago my Aunt Claire received a very unpleasant surprise. Someone decided to destroy one of the tires on her car. Awesome huh? They punctured a hole into one section and then added three other slashes throughout the rest of the tire. They literally spread out the hole and slashes so they were almost evenly spaced around the tire. They obviously wanted to make sure the tire had absolutely no chance and they succeeded. Her tire was as flat as can be. Thankfully they only attacked one but we think it was simply because a car was coming down the road and they fled. Oh and did I mention she had just put 4 brand new tires on the car at the end of May?

We have no idea why they did it. There are never issues in this neighborhood and even the police were surprised. We have absolutely no issues with anyone so it couldn't have been truly directed at her. Clearly some teenagers had way too much time on their hands when they should have been home since it was after . Makes me wonder if they were allowed to be out that late or if they snuck out to get into things. Who knows?

Unfortunately we have no idea who they were or where they live. All we know was there were two teenagers running from our yard but it was too dark to really see. The police also said there have been no other reports of other vandalism in the area so for some reason my Aunt's car was their one and only target. My only guess was they picked it because it was parked on the side of the road in front of our house and possibly decided was easier than going into someone's driveway especially since my hubby's car and mine were completely untouched. My other guess was they were bored and thought it would be funny. That tends to be the reasoning teens use for stupid decisions so that's what I'm going with.

So there's nothing we can really do and they probably think it's hilarious that they got away with it. The tire has been replaced so all is well with her car now. I'm a bit unnerved that there were two idiots hanging out in front of my house destroying property and got away with it. Hopefully our neighborhood can return to quiet and uneventful as it has been in the past.

NYC in Greenwich Village with Zebra print!

Goodbye blue, hello pink! After several weeks of reds, blues and more blue I have returned to my true color. I feel like myself again. Don't get me wrong, I love my other colors and designs I've done lately but wearing pink always makes me feel like me.

This time I pulled out a color I've had for a while and what I lovingly refer to as my 'cheapies'. I literally bought this at Target for a little over a $1 but I can't help love the color. It's a NYC in a New York Color Minute bottle named Greenwich Village. It's a berry pink but still bright and summery. The application isn't the best and it's no where near as smooth as Zoya but it's purely the color that keeps me coming back. Unfortunately, I completely forgot to take a picture of the color on its own! I painted them last night but wanted to wait for the sunlight and forgot. Oops!

What I do have photos of is my results after stamping over the Greenwich Village with my MASH plate m57. I picked the zebra print and used Orly Blackout that I bought in a miniature bottle. I can't really speak for how well it works for painting since this is my first time using it but I can say it stamped very well.


Call me in love! I'm not usually into animal prints but I can't stop staring at this design. The black pops off the pink really well. I've had this design in my head for days now and I'm so glad I finally did it! I'm thrilled with how it came out and I can see myself doing it again.


If you're interested in the color you can usually easily find them at Target and all the colors in this line are named after different places in New York City. It's a fun concept and an easy and cheap way to experiment with colors.

Now that Zoya has announced their promo to celebrate reaching 50,000 likes on Facebook I'll be planning a new order. Yay! If you haven't already, head over to the Zoya Facebook to learn about the details!

Happy Friday!

OPI White Shatter over Zoya Breezi!

I finally bought OPI White Shatter a few weeks ago after having a pretty hard time finding in stores. I finally got around to using it today in honor of OPI's Day of Shatter that they posted about on their Facebook page. I was still wearing my Zoya Breezi manicure so I decided to shatter right over that for a great white and blue contrast. I'm so happy with how it came out!

I admit I was a tad unsure about using the shatter for the first time as I wasn't totally sure how thin or thick to put it on to get the right look. Luckily the coats I did worked perfectly and it looks pretty awesome. Zoya Breezi is showing through very well and plays off the white well. It gave new life to my several day old mani! It's such a fun twist and really easy to do.

For me it worked out doing somewhat thin coats but not too thin or it will streak which I think is simply because it's a white. I also dries very fast so you have to be pretty quick with each nail. Cleaning it off my skin was pretty simple too so don't worry if you're a little messy when applying. I use a nail corrector pen and it came right off even after it dried. You have to be willing to let the nails look a bit different from each other since it will shatter in different ways each time. Sometimes that's hard for me but I was able to let it go to enjoy the look.

It does dry a bit rough so it won't feel silky like a typical polish. Once it dried I used Seche Vite so I wouldn't have issues with it flaking off or catching on clothing and it made it mostly smooth to the touch. It will keep it protected though so I won't have to worry. Yet another reason to invest in a great top coat, it's an absolute must!

I know a very important tip for all shatters and crackles is you must let your polish dry completely before using! I didn't have any issue with this since I did it days after my original manicure but you absolutely can do it same day as long as you be patient and let your base color completely dry and set. I already had a layer of Seche Vite on over Breezi and it still shattered beautifully so using a fast dry top coat is a great option before using the shatter.

So if you're still on the fence about buying a shatter or crackle maybe this will help you try it out. It's a fun look and even more fun to do. I loved watching it slowly shatter across my nail! I think I want to try a silver shatter next. I'm still not on board with the red shatter/crackles for some reason but might give in eventually.

Zoya Breezi Swatch and Zoya Color Spoon Comparison!

After wearing my 4th of July mani for several days I decided I needed something a bit more toned down. The only problem was I couldn't decide which color to wear! Such a dilemma. So I put the hubby to work and asked him to pick a color for me. His choice was Zoya Breezi which is the same color I used for the blue fireworks designs but I so don't mind. I absolutely love this color and I used to never even touch blue polishes before. Zoya converted me!

Before I bought this bottle I ordered one of Zoya's color spoons that they offer for almost all their colors. If you never heard of or purchased a color spoon they really are a great invention! The concept is very simple: Zoya makes small spoon like sample of their colors and sell them for $0.50 each (with free shipping). The spoon lets you place the color against your nails and skin to help decide if it's a color for you. The best part is for each spoon you buy you get a credit for the spoon price that you can put towards future purchases. Pretty awesome right? You get to give a color a test run before investing in a bottle which makes buying nail polish online that much more simple! Clearly I'm in love with this concept.

If you're anything like me you're probably wondering how accurate the color spoon sample is to the actual color. Well, that's what this post is for. I decided to show how the spoon for Breezi compares to the color painted on my nails. So, let’s get to it!

I had a hard time getting pictures today since it's so cloudy and gray here. Here's the best attempt I could get to show Breezi in natural light.


It's not the best picture ever but it's the best I could do with the crappy weather. I wanted to get it though to show the difference in the color from natural light to artificial. Here's a picture I took inside with an overhead light.


See the difference? Either way the color is gorgeous! I enjoy when colors change a bit from inside to outside light. Gives you a little variety within one manicure. The formula for Breezi is very smooth and is completely opaque in two coats which I did above. You could probably get away with one coat if you put it on a little thick but I always try to keep my coats thin and do at least two almost always. Zoya describes Breezi as a "Soft, dusty, dirty medium cerulean blue with an opaque cream finish.  A super chic high-fashion denim look for nails." I really couldn't describe it any better. Some people might find this color to be a bit dark for summer but I still love it.

Now on to the spoon comparison pictures! Zoya sends their spoons in the cutest little match book like holder but the spoon itself is a perfect size to hold over your nail to get a good feel for the color. Here's the spoon on its own.


You can see that the color is in a generic nail shape with a shiny finish to help you see how the color would look on your nails with a top coat. Each spoon is labeled with the name of the color next to the Zoya name which you can sort of see in the picture. The names are quite small on the spoon which is my only complaint but it's not a major issue. It's still easily readable so I don't mind too much.

I was impressed when I held the spoon up to my finished Breezi mani and I think you will be too.


How's that for an accurate representation? This picture was taken in the same artificial light as the other one I posted above and the color is dead on. After seeing how well the spoon held up to the actual color I will definitely be ordering more spoons when shopping for colors from Zoya, especially the ones I'm not completely sure about based on the web photos.

So there's my little compression. Hopefully it will help someone who was a little unsure about the spoons feel more comfortable.

Enjoy your weekend!

*Disclaimer* - I was in no way compensated for this review by Zoya or any other party. All opinions of this product are purely my own and are in no way influenced by anyone or any brand.

(Part 2) Fireworks and flag mani! - 4th of July 2011

Well friends, I did a redo. I decided I wasn't happy with the stripes in my first Fourth of July design that I did yesterday. My mind kept going to candy canes instead of the flag so I decided to do it over. Here is my second 4th of July mani (and my last for this year).


I'm much much happier with this one! As you can see, I replaced the red and white stripes with more fireworks. On my middle finger and pinky on both hands I used Zoya Breezi as a base and Zoya Sooki with OPI Alpine Snow to make the fireworks design. I topped them with a bit of Stripe Rite red glitter and Wet & Wild Kaleidoscope just as I did before with the red style. I think it's a nice contrast and a bit of variety with the full fireworks design. Plus I was able to have more blue than I had before. I'm actually really in love with this!


My Aunt Claire never wears nail polish or makeup but is actually enjoying watching me play with different designs and is pretty interested in how I do each one. This one though, is the first one that has made her consider having me doing her nails! Now that's a compliment!

To switch it up a bit I did a different design on my thumbs. For this I used a base of OPI Alpine Snow (still a pain to do full nail coverage) with Zoya Sooki stripes and Zoya Breezi star stamping to create a flag. My hubby calls it a more abstract American flag because of the way I did the stripes.


I used MASH plate m44 for both the stripes and the stars to create this look. Both stamps are actually made for the tips which are why the stripes have the curve but I thought it would give it a bit of a different look for a flag nail designs.

I'll be keeping this look through the rest of the holiday weekend and our trip to Fenway Park to see the Red Sox play the Toronto Blue Jays on Tuesday the 6th. Even though Independence Day will be over the colors still fit with the Red Sox colors so it works.

What do you wonderful readers think of this design? I would love to see your feedback!

Enjoy your holiday!

Fireworks and stripes mani! - 4th of July 2011 (Part 1)

I can't believe it's already the first week of July! It's my favorite month of the year but I can't believe the year is going by so fast. My birthday being at the end of the month probably has something to do with it being my favorite but the fireworks, cookouts, warm weather and being out in the sun is pretty awesome too.

Anyway, as part of our celebrations I decided to do an Independence Day manicure like so many other nail addicts bloggers are doing. This is actually my first attempt at a free handed design and I'm happy with how it came out. My left hand looks the best since I'm right handed which means I'll just have to half ignore my right hand since it's not quite as good as I want it to be.

For the design I did white with red strips on 6 of my nails and red with white, blue and glitter fireworks on the other 4. It was so much fun!


For this design I used Zoya Sooki, Zoya Breezi, OPI Alpine Snow, Stripe Rite red glitter, Wet & Wild Kaleidoscope and Seche Vite to set it all in place. Phew! That's the most I've ever used on one manicure. It was all worth it though and definitely the most fun I've had making a design.


For the stripes and fireworks I used a very fine nail art brush I bought at Sally's. It's actually a double tool with a fine brush on one end and a small dotter on the other. I'm really happy with the brush so far. It's firm but still a bit flexible and pretty thin for small details. The best part is the end with the brush is actually curved so you can see what you doing without the handle being in the way. It's a nice little design feature.


The only thing that gave me an issue was actually the OPI Alpine Snow. I don't know if I just have a weird bottle but the formula is kind of thick and a pain to paint the entire nail. Up until now I had only used it for stamping which it has worked great for but using it for full coverage wasn't fun at all. My Zoya's on the other hand went on beautifully as usual so I'll probably just order a bottle of white from Zoya. Maybe Purity or Snow White.


I haven't used it for anything I've shared on this blog yet but I absolutely love Zoya Sooki (yes as in True Blood Sooki)! It's a beautiful red. It reminds me of fresh blood which is kind of a morbid comparison but it fits since the name is shared with the main character of a vampire series on HBO. It's definitely a red I would recommend to anyone shopping for one.

I hope everyone has a fantastic holiday weekend! Hopefully you will have the chance to see a great fireworks show or two and spend some time with family and friends. Stay safe and have fun!

Happy 4th of July!