Showing posts with label Blues. Show all posts
2 comments

Zoya Charla - Oh how I love you!

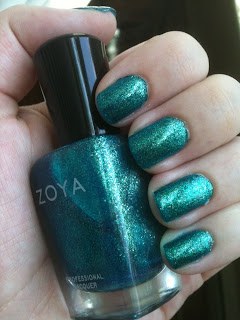
I was a bit sad to remove my water marble yesterday but was even more excited to try out my Zoya Remove+ and new Zoya Charla and they did not disappoint! For one, the Remove+ is awesome! I used less cotton pads and less remover than I've ever used with other brands and my nails were perfectly clean. I actually was able to do all 10 nails with only two small cotton pads. It was fantastic! Best of all not a single person complained about the smell and my fingers didn't feel sticky and dried out. I'm officially in love with Remove+ and would highly recommend it to anyone!

Now on to the best part. When I spread Charla across my first nail I actually had an audible gasp at how pretty it was! I had seen plenty of pictures of it online before buying but it's just so different in person. I was in awe of it right away. After only completing 5 nails I even posted about it on Facebook! It is by far my favorite color in my collection right now and that's saying something since I love almost everything I own right now. I have plenty of pictures to share with you to show the way it changes in different light so let's just get right to it.


This picture was taken in the sun along side a window and it's just beautiful! The application was fantastic. The formula is a bit thin but it spreads wonderfully and I didn't have any problems with it running. I actually could have just left it at one coat since the coverage was so great but I still did my automatic two. Describing Charla is really hard since it looks different in different light sources. In the picture above it looks teal with green and sometimes silver shimmer. It plays in the sunlight so wonderfully. I didn't think this did it enough justice though and pushed for a better sunlight picture which wasn't easy with the cloud cover we had today.


Look at that! In more direct sunlight it just lights up with a beautiful sparkles and comes off very blue (ignore the tire to my jeep in the background). My neighbor probably thinks I'm crazy since I was standing at my door for a while trying to catch a good picture of my nails in the sun. The clouds weren't cooperating so it took several tries. Oh well, it was worth catching the sparkle in this picture! You can see very little green in this picture compared to the indirect sunlight one from above but Charla isn't done yet. This color has a lot of tricks hidden in this bottle and gave me a completely different look when I snapped a picture inside with artificial light.


Just like that, Charla is suddenly more green than blue. It's like having three colors in one bottle and you just never know which one will flash its beauty. No matter what light I'm in I still have nothing but love of this color. It's so much fun! The way it looks inside with lamp light in the picture above actually reminds me of Emerald City from the Wizard of Oz which is exactly what my hubby said when he saw it when he got home. Then I showed him how it looked outside and he was surprised at the change! I'm happy to also say that he was impressed.

I consider this color a must have for anyone that likes a little sparkle in their life! It's fantastic for summer and so many people have said it looks fantastic underwater. I haven't been able to test that out but I can imagine the beauty. I can't wait to try out Gilda which is from the Sparkle collection which is the same as Charla. Check back for that later this week!

Tomorrow is my birthday and my hubby and I are spending the day in Connecticut. We're heading to Mystic Aquarium for the day and my nails will fit right in. It was a complete coincidence that I used Charla in time for our visit there but it worked out quite well. Maybe I'll get to see them underwater after all since they have an area where you can pet certain sea creatures!
6 comments

My first ever water marble!

Ever since I saw a picture of a water marble I was fascinated! I automatically assumed it was complicated and dismissed the idea of ever doing it. Then I happened to come across a video tutorial on Youtube when I was browsing other nail videos. When I saw how simple it seemed I decided to give it a try. Then I put it off and sort of avoided it. Call me a chicken.

Then last night I once again was stuck on what to do next. I needed to do something because I can no longer leave my nails naked but I'm expecting my new Zoya order tomorrow (yay!). I left it up to the hubby again and of course the first thing he said was to do a marble. Sigh. He picked three colors he thought would be good together and declared it my new mani. So off I went and it was horrible. The nail polish decided it hated my water and refused to cooperate. I was frustrated and quite annoyed. So I ditched my room temperature filtered water and cleaned up the mess and walked away. I gave up.

Then this afternoon I decided I must win. I couldn't let it beat me. I grabbed some room temperature distilled water instead and gave it another try. Guess what? Success! It worked and I was thrilled. I taped up my fingers like one tutorial said which was weird and sometimes difficult. Especially when I had to finish the last few fingers with the others covered in tape. Anyway, I picked an order for the colors and dove right in. I'm very happy to say that I now have 10 water marbled nails and I'm very happy with how it looks. Was it messy? Oh my god yes! It's almost insane. I had so many toothpicks covered in nail polish, the bowl looked like half a rainbow exploded and very colorful pieces of tape were scattered around my table. I should have taken a picture of the aftermath but I didn't. In the end though, this was my result.


TaDa! My hubby's three choices were Zoya Breezi, Essie Turquoise & Caicos and Orly Blackout. He apparently really likes Zoya Breezi since it's the second time in a month that he picked it as part of his choice. The colors actually worked really well together and all three spread across the surface of the water pretty well. Its funny how doing basically the same pattern each time created such different results. It's actually fun to watch different designs appear in the bowl. Mine was wide enough that I could do two fingers at a time which made it much quicker.


You can see a little smudging at the base of my pinky from when I removed the tape. After that I cut the rest of the pieces off to avoid messing up all the work I had just finished. Even though Orly Blackout is normally quite dark, once it was in the middle of the marble and other colors it actually appears slightly brown on the nail. There's only one nail that it actually came out dark enough to be an obvious black. I'm still really happy with it though whether it looks brown or black.

So, would I do a marble again? I think so. It's fun to play with the nail polish and create a unique design in the water. Would I do anything different? Besides trying other colors, not really. I will cut the tape off all the nails next time but that's the only change. The tape is worth the effort as it made cleanup much faster. There was very minimal nail polish on my skin so it only too a couple q-tips to clean up the very edges of all 10 nails. I will jump right to the distilled water next time since that obviously worked much better. I guess our filtered tap water just isn't friendly enough. Would I recommend a water marble to someone else? Sure! As long as you're prepared for the mess and possible frustration if your nail polish and water won't play together. In the end it really does create an interesting effect.

Tomorrow my new Zoya order should arrive as long as FedEx delivers like they said they would! I took advantage of their promotion for reaching 50,000 'likes' which offers a free bottle of their Remove+ with any purchase. It's still going if you're interested and you have until the 24th! I can't wait to try their polish remover for the first time and play with my new colors.

Happy weekend!
No comment yet

OPI White Shatter over Zoya Breezi!

I finally bought OPI White Shatter a few weeks ago after having a pretty hard time finding in stores. I finally got around to using it today in honor of OPI's Day of Shatter that they posted about on their Facebook page. I was still wearing my Zoya Breezi manicure so I decided to shatter right over that for a great white and blue contrast. I'm so happy with how it came out!

I admit I was a tad unsure about using the shatter for the first time as I wasn't totally sure how thin or thick to put it on to get the right look. Luckily the coats I did worked perfectly and it looks pretty awesome. Zoya Breezi is showing through very well and plays off the white well. It gave new life to my several day old mani! It's such a fun twist and really easy to do.

For me it worked out doing somewhat thin coats but not too thin or it will streak which I think is simply because it's a white. I also dries very fast so you have to be pretty quick with each nail. Cleaning it off my skin was pretty simple too so don't worry if you're a little messy when applying. I use a nail corrector pen and it came right off even after it dried. You have to be willing to let the nails look a bit different from each other since it will shatter in different ways each time. Sometimes that's hard for me but I was able to let it go to enjoy the look.

It does dry a bit rough so it won't feel silky like a typical polish. Once it dried I used Seche Vite so I wouldn't have issues with it flaking off or catching on clothing and it made it mostly smooth to the touch. It will keep it protected though so I won't have to worry. Yet another reason to invest in a great top coat, it's an absolute must!

I know a very important tip for all shatters and crackles is you must let your polish dry completely before using! I didn't have any issue with this since I did it days after my original manicure but you absolutely can do it same day as long as you be patient and let your base color completely dry and set. I already had a layer of Seche Vite on over Breezi and it still shattered beautifully so using a fast dry top coat is a great option before using the shatter.

So if you're still on the fence about buying a shatter or crackle maybe this will help you try it out. It's a fun look and even more fun to do. I loved watching it slowly shatter across my nail! I think I want to try a silver shatter next. I'm still not on board with the red shatter/crackles for some reason but might give in eventually.
2 comments

Zoya Breezi Swatch and Zoya Color Spoon Comparison!

After wearing my 4th of July mani for several days I decided I needed something a bit more toned down. The only problem was I couldn't decide which color to wear! Such a dilemma. So I put the hubby to work and asked him to pick a color for me. His choice was Zoya Breezi which is the same color I used for the blue fireworks designs but I so don't mind. I absolutely love this color and I used to never even touch blue polishes before. Zoya converted me!

Before I bought this bottle I ordered one of Zoya's color spoons that they offer for almost all their colors. If you never heard of or purchased a color spoon they really are a great invention! The concept is very simple: Zoya makes small spoon like sample of their colors and sell them for $0.50 each (with free shipping). The spoon lets you place the color against your nails and skin to help decide if it's a color for you. The best part is for each spoon you buy you get a credit for the spoon price that you can put towards future purchases. Pretty awesome right? You get to give a color a test run before investing in a bottle which makes buying nail polish online that much more simple! Clearly I'm in love with this concept.

If you're anything like me you're probably wondering how accurate the color spoon sample is to the actual color. Well, that's what this post is for. I decided to show how the spoon for Breezi compares to the color painted on my nails. So, let’s get to it!

I had a hard time getting pictures today since it's so cloudy and gray here. Here's the best attempt I could get to show Breezi in natural light.


It's not the best picture ever but it's the best I could do with the crappy weather. I wanted to get it though to show the difference in the color from natural light to artificial. Here's a picture I took inside with an overhead light.


See the difference? Either way the color is gorgeous! I enjoy when colors change a bit from inside to outside light. Gives you a little variety within one manicure. The formula for Breezi is very smooth and is completely opaque in two coats which I did above. You could probably get away with one coat if you put it on a little thick but I always try to keep my coats thin and do at least two almost always. Zoya describes Breezi as a "Soft, dusty, dirty medium cerulean blue with an opaque cream finish.  A super chic high-fashion denim look for nails." I really couldn't describe it any better. Some people might find this color to be a bit dark for summer but I still love it.

Now on to the spoon comparison pictures! Zoya sends their spoons in the cutest little match book like holder but the spoon itself is a perfect size to hold over your nail to get a good feel for the color. Here's the spoon on its own.


You can see that the color is in a generic nail shape with a shiny finish to help you see how the color would look on your nails with a top coat. Each spoon is labeled with the name of the color next to the Zoya name which you can sort of see in the picture. The names are quite small on the spoon which is my only complaint but it's not a major issue. It's still easily readable so I don't mind too much.

I was impressed when I held the spoon up to my finished Breezi mani and I think you will be too.


How's that for an accurate representation? This picture was taken in the same artificial light as the other one I posted above and the color is dead on. After seeing how well the spoon held up to the actual color I will definitely be ordering more spoons when shopping for colors from Zoya, especially the ones I'm not completely sure about based on the web photos.

So there's my little compression. Hopefully it will help someone who was a little unsure about the spoons feel more comfortable.

Enjoy your weekend!

*Disclaimer* - I was in no way compensated for this review by Zoya or any other party. All opinions of this product are purely my own and are in no way influenced by anyone or any brand.

2 comments

(Part 2) Fireworks and flag mani! - 4th of July 2011

Well friends, I did a redo. I decided I wasn't happy with the stripes in my first Fourth of July design that I did yesterday. My mind kept going to candy canes instead of the flag so I decided to do it over. Here is my second 4th of July mani (and my last for this year).


I'm much much happier with this one! As you can see, I replaced the red and white stripes with more fireworks. On my middle finger and pinky on both hands I used Zoya Breezi as a base and Zoya Sooki with OPI Alpine Snow to make the fireworks design. I topped them with a bit of Stripe Rite red glitter and Wet & Wild Kaleidoscope just as I did before with the red style. I think it's a nice contrast and a bit of variety with the full fireworks design. Plus I was able to have more blue than I had before. I'm actually really in love with this!


My Aunt Claire never wears nail polish or makeup but is actually enjoying watching me play with different designs and is pretty interested in how I do each one. This one though, is the first one that has made her consider having me doing her nails! Now that's a compliment!

To switch it up a bit I did a different design on my thumbs. For this I used a base of OPI Alpine Snow (still a pain to do full nail coverage) with Zoya Sooki stripes and Zoya Breezi star stamping to create a flag. My hubby calls it a more abstract American flag because of the way I did the stripes.


I used MASH plate m44 for both the stripes and the stars to create this look. Both stamps are actually made for the tips which are why the stripes have the curve but I thought it would give it a bit of a different look for a flag nail designs.

I'll be keeping this look through the rest of the holiday weekend and our trip to Fenway Park to see the Red Sox play the Toronto Blue Jays on Tuesday the 6th. Even though Independence Day will be over the colors still fit with the Red Sox colors so it works.

What do you wonderful readers think of this design? I would love to see your feedback!

Enjoy your holiday!
No comment yet

Fireworks and stripes mani! - 4th of July 2011 (Part 1)

I can't believe it's already the first week of July! It's my favorite month of the year but I can't believe the year is going by so fast. My birthday being at the end of the month probably has something to do with it being my favorite but the fireworks, cookouts, warm weather and being out in the sun is pretty awesome too.

Anyway, as part of our celebrations I decided to do an Independence Day manicure like so many other nail addicts bloggers are doing. This is actually my first attempt at a free handed design and I'm happy with how it came out. My left hand looks the best since I'm right handed which means I'll just have to half ignore my right hand since it's not quite as good as I want it to be.

For the design I did white with red strips on 6 of my nails and red with white, blue and glitter fireworks on the other 4. It was so much fun!


For this design I used Zoya Sooki, Zoya Breezi, OPI Alpine Snow, Stripe Rite red glitter, Wet & Wild Kaleidoscope and Seche Vite to set it all in place. Phew! That's the most I've ever used on one manicure. It was all worth it though and definitely the most fun I've had making a design.


For the stripes and fireworks I used a very fine nail art brush I bought at Sally's. It's actually a double tool with a fine brush on one end and a small dotter on the other. I'm really happy with the brush so far. It's firm but still a bit flexible and pretty thin for small details. The best part is the end with the brush is actually curved so you can see what you doing without the handle being in the way. It's a nice little design feature.


The only thing that gave me an issue was actually the OPI Alpine Snow. I don't know if I just have a weird bottle but the formula is kind of thick and a pain to paint the entire nail. Up until now I had only used it for stamping which it has worked great for but using it for full coverage wasn't fun at all. My Zoya's on the other hand went on beautifully as usual so I'll probably just order a bottle of white from Zoya. Maybe Purity or Snow White.


I haven't used it for anything I've shared on this blog yet but I absolutely love Zoya Sooki (yes as in True Blood Sooki)! It's a beautiful red. It reminds me of fresh blood which is kind of a morbid comparison but it fits since the name is shared with the main character of a vampire series on HBO. It's definitely a red I would recommend to anyone shopping for one.

I hope everyone has a fantastic holiday weekend! Hopefully you will have the chance to see a great fireworks show or two and spend some time with family and friends. Stay safe and have fun!

Happy 4th of July!
No comment yet

Mini Ulta haul!

I just got back from a trip to my local Ulta and have a little haul I wanted to share. I love going to Ulta! My only complaints are they need to carry more Zoya and I wish their nail polish wasn't so spread out around the store. Took me ten minutes to find the OPI shatter collection! Why they had it tucked in a corner on a little table is beyond me. Anyway, here's what I bought!


I finally found OPI White Shatter! I've wanted this since it came out and I first saw the pictures of the other shatter colors. When I finally found the collection the main display was all black and red. Honestly? The red doesn't look appealing at all. I usually enjoy red but as a shatter I just don't really get it. Anyway, the white was on a lower display hidden in the back and it was the only one left! Woohoo! I grabbed it and went straight to the checkout. I think I was so happy to finally find it in store that I just wanted to make it officially mine.

I also grabbed Essie Turquoise & Caicos which is a just a perfect name. I'm excited to try this one. It seems perfect for summer and almost like a little vacation in a bottle! I bought 'Baby' Blue from Nicole by OPI too but I'm going to pretend it's not from the Justin Beiber collection (so not a fan of his) and just enjoy the color. It's a nice sky blue which I needed to add to my stash. I already have a plan for this color for an upcoming mani. Then we have the mini bottle of Orly Black Out. I needed a black for some stamping manicures I want to do but didn't really need a large bottle since I never wear solid black on my nails. Actually, I don't even wear solid black in my wardrobe either. I almost bought Liquid Leather by China Glaze but grabbed this little one instead. We'll just have to see how it works out.

My hubby has decided that I'm completely addicted to nail polish and he's pretty much right. But what can I say? They're just too much fun. Also? Apparently OPI came out with a Shrek collection at one point that I never even heard about. My Ulta was sold out so I didn't even get to see the colors. I know at least one is called What's with the catittude? and I just love the name. I don't even know what the color is but I want it. That's probably what my hubby means when he says I'm addicted. Oh well. He bought a new PS3 game while we were out so we both got our new toys and everyone is happy.

Tomorrow is a mani with my one of my new pretties!